Yesterday a close friend messaged me asking, “Is there
something wrong with your blog, it isn’t showing any posts after the 18th
of December.” I laughed (sheepishly) and told her well that it is because I
haven’t posted any! “Really? For almost
two months you haven’t posted a thing!” she seemed shocked.
I too was shocked that I had been away from my favorite
place for this long. And so I am here today to correct that. Correct
that with a post that I love to write here each year. Sara’s birthday post.
Yes, ten days back she turned five. And I still find it hard to believe that
four years ago I shared her first birthday right here.
Over the years, I’ve shared with you lovely readers
all of her birthdays (sans the last one when we were to vacate the house the
next day for our entire home was to be shipped to Dubai and I couldn’t post but
I promise to share that pretty soon) for doing that allows me to make all of
you a part of our happiness which is what I love about blogging the most.
The girl has been obsessed with garden fairies for
over two years now, so much so that she even wears her wings while sleeping and
pretends that she lives in a toadstool! So the theme was pretty much
pre-decided and like always we had a small get together at home just the way my
mom did. Handcrafting everything right from the invitation card to the décor,
cooking every little morsel and keeping it sweet and really small; sharing the
day with six of her “best friends”.
Pink just had to be there was the little girl’s
request and pink there was. What is a garden fairy party without some green and
ofcourse the fairy and that was the starting point.

We had very simple pink invitation cards for each of
her friends with lots of sparkle and doilies with a short and sweet message
inviting the fairies into the enchanted garden (Free printable from here).


I must mention here that each time Sara passed by the blackboard
(before and after the party) she read the question and declared loudly to no
one in particular, “Yes, I do!” and
then broke into a big smile :)

Each of the little fairies were handed over their wings
upon entering the home and I have to say that with seven little girls
fluttering away I really didn’t need any décor because all eyes were on them.
For a while they enjoyed playing in Sara’s room, post
which I had two fun games planned for them.
One was a garden fairy version of the musical chairs.
Musical Toadstools. I cut out several red circles out of thick handmade paper
and then pasted smaller white circles on it so that they resembled toadstools.
They not only looked cute on the green carpet (once again from Sara’s room) for
they looked like toadstools on grass but also I didn’t have to worry about
arranging seven chairs!

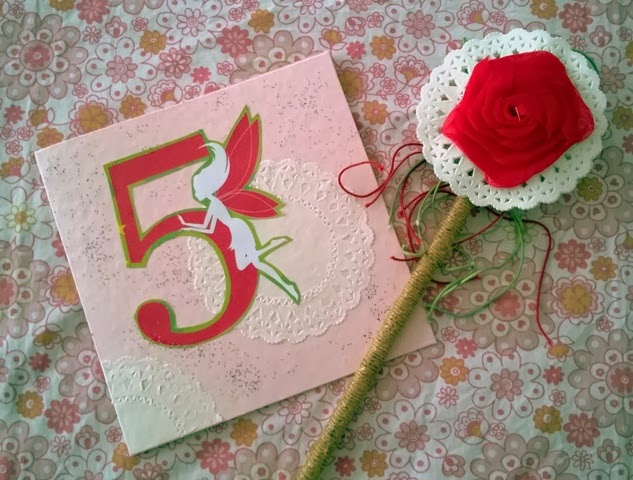
For my little birthday fairy who
was in her white wings I handcrafted the wand that would go with her dress and
the invitation card. Some twine around a chopstick, a doily, a handcrafted rose
and some pink and green strings (left from her third birthday) and it was
ready. She loved it and that made me very happy.

Post that we had a treasure hunt of sorts where the
girls sat on their toadstool mats and I handed them over pink bags to collect
their little treasures that were hidden in the living area. I used small pink
gift bags and simply pasted a doily cut in half to maintain the theme.
Each one got a turn to open the little box that
contained the clues and their mums helped them to read and solve.
Each clue took them to a little goodie box which had seven goodies each and the
little fairy had to share her treasure with all the other fairies. It was
really cute watching them all wide eyed and surprised and also sharing the
goodies with their friends; making sure they didn't miss anyone.
The hidden treasures were:

- Fairy dust (Bottle containing glitter)
- Shiny rocks (M&Ms wrapped up in some foil and made to look like sparkly rocks)
- Pixie kisses (Hershey’s kisses)
- Fairy clouds (little bags of popcorn)
- Gold coins (Chocolate gold coins)
- Sparkly hairbands (the set of wings that the girls got upon entering came with the magic wands (which I distributed during the musical toadstools game) and the fairy hairbands. So basically I used each of the three elements separately through the party. Once again for the birthday fairy I handcrafted her hairband. I used some tulle from an old torn tutu of hers and some beads I had on hand and handmade flowers; all on an old hairband of hers which she instantly recognized and said but this is my old headband! Kids I tell you!)

By
now the fairies had played enough and were famished and so where their mums.
Except for the cake that I never make for her birthday for there are just too
many things to prepare and look after that day and also I don’t think I can
ever match up to what Aya did for us I made everything at home.

Aya
from Aya Cupcakes did a fabulous job on the cake. I had sent her picture of
what Sara and I had selected and what a fabulous job she did. It was like my
little girl sitting there.


Too pretty to touch?

We couldn't make ourselves eat that
pretty fairy and once the party was over we made Sara hold her and clicked
away.

Next to the cake is my alarm clock which I took the
cells out off and got the needles to represent her time of birth. A tiny easel
with the card (a little variation of the invitation card, can you tell or is it just me!) that doubled up both as décor and a wishing card of sorts which we
used to capture the lovely wishes from the guests and this AWESOME garden fairy
terrarium that a dear friend made herself and gifted to my little girl.

It was a gift that was shouting handmade, creativity
and gorgeousness. You guys know me well enough I am sucker for handcrafted goodness and I wanted to give my heart away in return.

Just check out that mini pinwheel, those little
mushrooms and ofcourse the fairies. I had half a mind of stealing it away from
Sara for my room! Actually to be honest I still have intentions of doing that.
Don’t kids get bored of things after a while, please tell me I am right:)
But I
digress. Coming back to the food the menu was garden fairyish, had to be.

- Pixie punch (apple & orange juice for the kids and homemade mint lemonade for the mums)
- Snail sandwiches (cream cheese & grated carrot sandwiches with cucumber for the antenna)
- Toadstools (Cherry tomatoes sitting on cheese)
- Garden veggies with yogurt dip
- Butterfly Pasta (For no party is completed without pasta in the words of Sara. A simple farfalle in homemade tomato, carrot and red bell pepper sauce)
- A patch of grass ( Sliced baguette with labneh, dill, mint, coriander, cherry tomatoes and cucumber silvers and chilli flakes for the mums)
- Gnome bites with three kinds of dips (Falafel wraps with hummus and pickled cucumbers. Once again more for the mums than the kids. Though to my surprise the kids liked it as well)
- Fairy clouds (Store bought candy floss)


And doilies once again for food labels.

We had a fun evening and we thanked our little guests
with a pretty pink noteback and a magic wand pen (Just my luck that I saw it at
a stationery store and had to pick those for party favors for they went so well
with the dreamy fairy theme).

I used simple brown paper (my favorite to wrap all
kinds of gifts) and made these little green gift tags with doilies and some sparkly nail paint for some shimmer.
The notes read, "Thank You Fairy Much!"

Also, I used a recent snap of Sara that we took during
the holidays when we visited a garden here for the table that carried the
wings, wands, return gifts and the treasure hunt bags. It was so appropriate
and it made me super happy seeing her as the “I” amongst the colourful and
vibrant words happy birthday. All made with flowers.

I used an old frame that we didn't need any longer and painted it white, distressed it a bit with sandpaper and used a thread to hang her happy-happy birthday picture.

And like each year I wanted Sara & us to look back
at the heartfelt wishes from each of the guests and we asked the guests to
write down a little note for her. It sure will be both nostalgic and
enjoyable years later when Sara and we sit down and go through it all.

I, of course needed something on the lines of an annual
leave after her party but I had so much fun putting it all together. I told
my sister may be that is the reason we decided to have a baby after all; to
throw cutesy birthday parties!!
Each year after her birthday party I think to myself that I
will now have to wait for one whole year to do this again and that kind of makes
me sad. However this year my little girl who is not so little anymore but who
enjoys putting parties together just like her mum, came to me the very same
evening and asked, "Mamma, How many days for my sixth birthday?! "
And I laughed. My daughter!

"365", I said.
Images : Personal Album. All images belong to purplehomes and are subject to copyright.