Showing posts with label Crafts. Show all posts

Thursday, April 29, 2010

My dream room!

Last week while doing some research for a project that I am currently working on, I came across this image (If I remember correctly this was a picture of a store). But for me this wasn't any pic. This is exactly how I imagine my dream room to be. I have tons of arts & crafts supplies all crying for space hiding in multiple cupboards. It would be so lovely to be able to have all of them together in a room like this.


A perfect table to work on with loads of shelves to store stuff on one side. More space on the wall. Pretty wicker baskets. A comfy stool. And the warm brown and hints of green everywhere in the room are to die for!

If you had some extra space what would you use that for? I'd love to know!

Image: here


psst: I got an email from "The Lean Remodeler" announcing a contest! Yay!  

Its very easy to enter. Take a picture of a room at your home that needs some serious reorganizing. Write a few lines about what you do there and how you would like to see it. It could be any room...a family room, a basement, a crafts room..sigh!! And mail it across. 

Together with the Wilsonart Design Team, The Lean Remodeler is giving away a $5000 family storage solution!!! Last date is 30th of April'10. So hurry up! 

And yes this contest is open only for US Residents ( Sigh...that leaves me out!). 

For more information, click here.

Wednesday, March 17, 2010

Flower Heaven

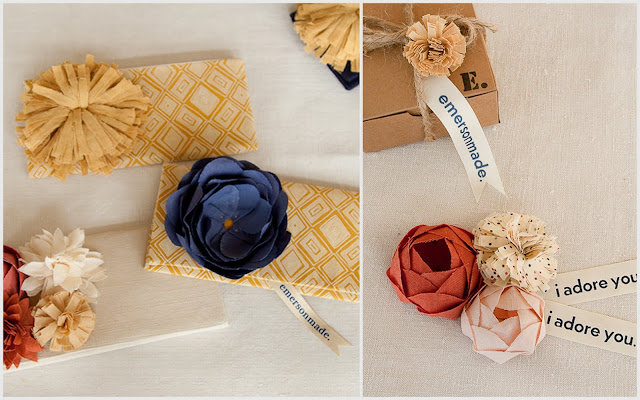
I happened to read about this really talented woman here and So I decided to check out her website. One click and I almost died because of the overdose of pretty things! Some one help me! I can't make myself stop looking at these beauties!

Though I am not a huge fan of the artificial flower. But looking at this, I want them all. And I want them now!  So before you make up your mind to read this post an further. Hold your heart! Take a deep breath and get ready to see dainty little somethings! Sigh!

The Dandy Collection


The Dahlias Collection. I love how they have shot each picture.

Roses and some more roses and some more

God! This one sure has me drooling! Just look at the wedding bouquet and those flowers in her hair

And here's something for the less adventurous. Flower Clutches anyone? 
Don't miss them on those gift boxes

So are you ready to meet the lady behind it all. Here, she is! This picture says it all :) Read more about her journey here. And get inspired. I need to get back to her product shots NOW!


Images : Here

Saturday, February 13, 2010

Dastkar 2010

Dastkar 2010 started yesterday and of course I had to be there asap. With DH travelling, Sara and I decided to go and have some fun! Sharing some glimpses of the wonderful Dastkar Mela! Its the perfect time for an open air thingie at Delhi, so all of you who stay in and around Delhi and love to see creative stuff, do take out some time to go there! Its on at the IGNCA Lawns, Janpath (Right opposite the National Archives, at the Rajpath - Janpath intersection) from the 12th to 21st of February.

And for those of you who can't make it to the fair, here are some glimpses!

The venue has lots of colorful elephants & cute little monkeys

Check out this wall art!

My absolute fav and seemed like the crowd's fav too!
Sondha, the Garden Shop run by Vinita Nath.

Though not a big fan of dry/ artificial foliage, I thought this looked pretty

I lost my heart to these wooden lanterns and bells

Aren't these kantha mosaics perfect for any child's room? Check out the detailing.

One of my all time favs, jugaad!

Cane baskets...ummm...no lamps!

Whimsical cushion covers & art on fabric by sumearth

Will these fishes fly!

Gorgeous! Isn't it?

Check out these colorful wallets & key ringsAlign Center

Beads, Beads and some more beads!

Images : Personal Album

Tuesday, February 9, 2010

Happy Birthday Sara!

Really? I mean are you sure? It’s already nine days since my lil girl turned ONE! And I will have to wait for ONE whole year to plan her 2nd birthday party :) Alright, I will wait patiently.

Today I am sharing with you some snippets from Sara’s 1st birthday! Ever since she came into my life, I have been baking a cake for her every 31st or 30th (28th in Feb :)) as the case may be to celebrate her monthly milestones. So you can imagine my excitement for her Big Day :)

Of course she had a very, very Pink birthday. I put my heart into planning this one and Sara and all of us had a great time! I hope you have a great time going through this very detailed post as well.

The party had to be at home (where she is most comfortable), between 4-6pm, (when she is active and fresh after her nap) and the guest list had to be small (I didn't want to intimidate her with 100 new faces). So she was surrounded by family and close friends and was a very happy birthday girl.

For my baby girl there had to be PINK, there had to be BLING and there had to be lots of DOTS! So I used lots of shades of pink paper, lots of shimmery sequins and beads and circles everywhere.

The Invite


For this I used my favorite font Mistral for the “1” on the card. And filled it up with several pink dots punched out of handmade paper and circular pink sequins. It was laborious but worth the final product.


The inside of the card also had two circles carrying the birthday verse and other details.


A polka dotted ribbon bow and pink beads completed it.

The Thank you Card


We sent these out after the party. It was a simple card carrying only two words “Thank You” which were painted by hand and once again a ribbon and beads tied it up all together.

The Big One

This was for the main door. I loved the texture of the wrinkly paper and the baby pink color. I used the same font Mistral and cut it out by hand. Then punched several holes all along the border.

Polka dot ribbon through those holes, lots of sequins and circular tags later it was on our front door.

Other Décor elements

For one of our walls I wanted to do one big piece that looked girly and arty at the same time. So I cut out several circles of different sizes. On some were glued sequins, on some beads, some had ribbons. And the wall décor was ready.

And there was a wishing tree.


This was made with an empty biscuit tin and some branches that I picked up from the street. The branches were painted silver and the tin was done up once again with layers of paper and few sequins.

Lots of handmade circular wishing cards and everyone was ready to wish the birthday girl years of good health and naughty times ahead.

A pink mobile

For this I followed the tutorial here, and made a pink mobile. The paper ornaments for the mobile were in different sizes and colors and Sara had fun playing with them ( As you can see from the pic;)). Finally tied it up with twine to an old silver circular frame I had.

Flowers & Balloons


Of course the home had to be filled up with pink flowers. For this a number of ice buckets with polka dotted ribbon tied around them dressed up as vases. I also used lots of baby food jars for baby breath as well.


And there were loads and loads of baby pink balloons and pink polka dot balloons as well.

Table Decor


Food placards and flowers made it all look pink. For the placards, I cut out several circles and wrote out the name of the dishes in silver. A bow in front and a bamboo stick behind and they were ready to be put inside the baby food bottles.


There was the polka dot pink cake and chicken and mushroom-onion quiche that I ordered. We had Alpenliebe strawberry candy (Yes, only because it’s pink and white). I made the rest at home, a chocolate trifle pudding, cocktail sticks, corn salad, chicken ham sandwiches, cabbage & carrot sandwiches, chicken nuggets, corn nuggets and cheese balls.


The food was placed on a combination of bowls, inverted platters and some on inverted cake tins (that I painted in two shades of pink) to give the table a certain dimension. More on these inverted cake tins tomorrow.

Party Favors

These were homemade chocolates (Strawberry, Mixed nuts & Butterscotch ) To pack them pretty, two large squares were cut and I tore them up slightly for the border and sewed the chocolates in them. Here’s how the final packing looked like.

Phew, a long post! I had a beautiful time making everything from scratch with my paws for the apple of my eye and I really, really wish her all the happiness in the world. Happy birthday Sara!

Images : Personal Album

Tuesday, November 24, 2009

Creating masterpieces out of the ordinary

I am loving these masterpieces created out of everyday stuff. Just look at this whimsical chandelier made out of shuttlecocks...pretty isn't it? This one has been created by Designer Gitta Schwendtner.

I bet you can't even guess what this chandlier is made up of. Here...here... let me give it away, plastic bags...yes the same ones that have been banned at Delhi. Spectacular!! British Designer Monica Hughes has created this warm and feathery lamp.

Ooooo...these super cute blossoms are made out of spoons. Designer Francois Legault is the guy behind them. Won't they look ultra cool above my dining table or even in my kitchen?

My favorite...or wait, those cute spoons are my favorite too ;) Created by artist Tracey Johnson these lights are made up of wine crates that she collected. She cut them up to mimic branches of trees and retained the wine company logos. Wow, now that is really neat!

Images : MH

Friday, September 25, 2009

Watch out for my guest post on the key bunch : Wrap them up !!

Note (2nd March'10) : I am publishing the full post for those of you who missed it way back in Oct'09. Here it goes :

"I was pleasantly surprised and happy to get an “email id please” request from the very creative Sharon of the Key bunch. And happier, when she asked me write a Guest Post for her awesome blog. Why?? The key bunch is one year old, that is why!!! Congratulations to both Sharon and Rekha for writing such a lovely blog and making us wait eagerly for new posts.
Here’s what I had to say…

I absolutely love this part of the year. Starting with Eid, followed by Dusshera, Diwali, Christmas, New Years…for me it doesn’t end here…there is Lohri and finally Holi. That is officially the end of the festival season for me and the next six months are spent waiting for this part of the year once again. Of course there is décor theme to be planned for each festival; there are menus to be decided, flowers to be bought, family and friends to be invited and finally gifts to be bought for people who matter to me. Thoughtful gifts that they will cherish (not the last minute biscuits and juice hampers…please). As much as I like giving gifts I also like wrapping them up creatively. I love it when they go oooo…aaaahhhhh just looking at the gift wrap. So here I have put together for you loads and loads of very easily done gift wrapping ideas for this BIG celebration season. I hope you enjoy trying out different wraps for a various festivals and surprising your loved ones (Don’t forget to include all the people who help you run your life and home all the year round ;))


This is indeed one of my all time favorites, I am very partial to brown paper…yes the same one that kids use to cover their notebooks. Tie a string around it, a shimmery ribbon, throw in some dried leaves and pinecones and any box would look great. Wrap up some patterned paper on it or simply paste paper cuts outs…the dreary old brown paper suddenly comes to life.
Another idea that helps us go green is to use old newspapers, books that you are planning to discard, glossy magazine sheets that anyways you are going to give away. Tie a bow made up bright ribbon or simply make loads of tiny spirals of the newspaper to give the gift a life. I have to admit out of all these I have a special fondness for the calendar idea where I can wrap up the gift in an old calendar sheet and mark out the special date. Sweet.

What can be better than giving two gifts than one…wrap up the gift with a silk scarf or a cotton napkin. Get some tiny potlis or simply stitch pretty pouches to gift jewellery. Your loved ones will cherish both the gift and the gift wrap for a long time to come.

Embellishments definitely make the plain and boring wraps look special. A nice little brooch, some pretty beads, shells picked up on a holiday…all look so good. I love the one with the bow shaped pasta…really that is pasta…isn’t that super cute!

No festival season can be complete without a sprinkle of gold and silver. I absolutely detest the shiny gold and silver sheets…they remind me so much of mithai shops. But these here I heart! Really classy thick gold and silver paper can add a lot of elegance to a gift. I also like the pretty flowers; one can easily make these at home. Also I think it’s a great idea to paint a silver leaf on to an otherwise plain black box.

I am often ridiculed by my family because I can never make myself throw old biscuit tins, chocolate boxes, empty glass jars…I end up repainting them and using them as gift wraps. So I got really excited when I came across these pics. The old paint tin in its new avatar with all those goodies inside…doesn’t it look divine? And the old tin box…I love-love-love it.
So use whatever you like, whatever you can lay your hands on…leaving you with another awesome idea I came across…twigs, pebbles, leaves...oh so gorgeous.
I’d love to hear from you, if you try out any handmade gift wraps this season, inspired by someone or creations of your own, do drop me a mail with the pics of course, at purplehomes.blogspot@gmail.com so that we can all go ooh-aah seeing them ;)
Loads and loads of good wishes to each one of you. Have a great time celebrating!!!
Images : All from the internet